


博客樱花飘落、网站运行统计、鼠标css样式更换等动态效果实现
1. 樱花飘落的动态效果设置
1.1 原理就是javaScript文件产生的效果,js代码比较长,写在html里太占篇幅,可以单独写下来再调用就好了;也可以直接引用链接,只要对方的网站里面没有删除这个javaScript就可长期使用。具体选择哪种就看你自己的喜好咯~
【yinghua.js】文件下载地址"https://www.liuzehe.top/upload/bkjs/yinghua.js"
如果你的博客linux系统中的话,可以直接使用wget或者curl来下载到你所需的目录下:
wget https://www.liuzehe.top/upload/bkjs/yinghua.js
1.2 在博客全局自定义head里面调用js文件就可以生成樱花飘落的效果啦,调用方法:
<!-- 樱花 -->
<script type="text/javascript" src="/你存放文件的目录/yinghua.js"></script>
1.3 博客上直接引用链接的方法:
<!-- 樱花 -->
<script type="text/javascript" src="https://www.liuzehe.top/upload/bkjs/yinghua.js"></script>
1.4 樱花飘落的效果图如下所示:

2. 网站运行天数的动态统计
2.1 和网页上樱花飘落的原理一样,同样是使用javaScript来生成的,注意:代码内容要放到网站的footer或header中才能生效!网站运行天数的动态统计javaScript代码内容如下:
<script>
    function secondToDate(second) {
        if (!second) {
            return 0;
        }
        var time = new Array(0, 0, 0, 0, 0);
        if (second >= 365 * 24 * 3600) {
            time[0] = parseInt(second / (365 * 24 * 3600));
            second %= 365 * 24 * 3600;
        }
        if (second >= 24 * 3600) {
            time[1] = parseInt(second / (24 * 3600));
            second %= 24 * 3600;
        }
        if (second >= 3600) {
            time[2] = parseInt(second / 3600);
            second %= 3600;
        }
        if (second >= 60) {
            time[3] = parseInt(second / 60);
            second %= 60;
        }
        if (second > 0) {
            time[4] = second;
        }
        return time;
    }
</script>
<script type="text/javascript" language="javascript">
    function setTime() {
        // 博客创建时间秒数,时间格式中,月比较特殊,是从0开始的,所以想要显示2月,得写1才行,如下
        var create_time = Math.round(new Date(Date.UTC(2021, 1, 10, 0, 0, 0))
                .getTime() / 1000);
        // 当前时间秒数,增加时区的差异
        var timestamp = Math.round((new Date().getTime() + 8 * 60 * 60 * 1000) / 1000);
        currentTime = secondToDate((timestamp - create_time));
        currentTimeHtml = currentTime[0] + '年' + currentTime[1] + '天'
                + currentTime[2] + '时' + currentTime[3] + '分' + currentTime[4]
                + '秒';
        document.getElementById("htmer_time").innerHTML = currentTimeHtml;
    }
    setInterval(setTime, 1000);
</script>
2.2 最后将如下代码插入到统计代码当中或着网站合适的位置(比如侧边栏)即可:
网站已经安全运行:<span id="htmer_time" style="color: red;"></span>
代码块里的color参数可以更改颜色,如blue改为蓝色
2.3 网站运行的天数的动态效果如图所示:

3. 网站上鼠标点击出现“爱国、友善、富强、民主”等特效
3.1 同样使用javascript代码来实现这一特效,代码内容如下:(其中的style代码块的内容可以放在你博客的自定义css样式表中,也可以放在你博客设置的全局head任意位置)
<style>
.text-popup {
    animation: textPopup 1s;
    color: red;
    user-select: none;
    white-space: nowrap;
    position: absolute;
    z-index: 99;
}
@keyframes textPopup {
    0%, 100% {
        opacity: 0;
    }
    5% {
        opacity: 1;
    }
    100% {
        transform: translateY(-50px);
    }
}
</style>
<script>
var fnTextPopup = function (arr, options) {
    // arr参数是必须的
    if (!arr || !arr.length) {
        return;
    }
    // 主逻辑
    var index = 0;
    document.documentElement.addEventListener('click', function (event) {
        var x = event.pageX, y = event.pageY;
        var eleText = document.createElement('span');
        eleText.className = 'text-popup';
        this.appendChild(eleText);
        if (arr[index]) {
            eleText.innerHTML = arr[index];
        } else {
            index = 0;
            eleText.innerHTML = arr[0];
        }
        // 动画结束后删除自己
        eleText.addEventListener('animationend', function () {
            eleText.parentNode.removeChild(eleText);
        });
        // 位置
        eleText.style.left = (x - eleText.clientWidth / 2) + 'px';
        eleText.style.top = (y - eleText.clientHeight) + 'px';
        // index递增
        index++;
    });
};
fnTextPopup(['富强', '民主', '文明', '和谐', '自由', '平等', '公正', '法治', '爱国', '敬业', '诚信', '友善']);
</script>
3.2 鼠标点击效果如下:
3.3 另外出现的鼠标跟随特效JavaScript代码下载链接: 点击下载 "https://www.liuzehe.top/upload/bkjs/mouse_slide.js"
调用方法同上面一样:
<!--鼠标点击特效-->
<!--方法1:调用自己下载下来的代码-->
<script type="text/javascript" src="/自己存放js文件的路径/mouse_slide.js"></script>

<!--方法2:直接引用服务器上的代码-->
<script type="text/javascript" src="https://www.liuzehe.top/upload/bkjs/mouse_slide.js"></script>
4. 鼠标自定义图标样式
4.1 先去网上下载你自己喜欢的鼠标样式,文件一般以ani结尾或者cur结尾,png的也适用。ani是动态图标,cur和png都是静态图标,如果搭建的系统是linux的话,是不支持ani后缀的图标哦!
我使用的是
【初音未来蓝色】下载地址"https://www.liuzehe.top/upload/bkphotos/default.cur"
【初音未来粉色】下载地址"https://wwwliuzehe.top/upload/bkphotos/pointer.cur"
【文本对应鼠标】下载地址"https://www.liuzehe.top/upload/bkphotos/Ha1.cur"
4.2 下载好对应的图标以后,在博客主题设置里自定义css样式里填写如下代码即可:
body{cursor:url('https://www.liuzehe.top/upload/bkphotos/default.cur'),default;}
a{cursor:url('https://www.liuzehe.top/upload/bkphotos/pointer.cur'),pointer;}
p{cursor:url('https://www.liuzehe.top/upload/bkphotos/Ha2.cur'),text;}
上面是直接引用我服务器上的代码,如果是自己下载的就在url('')里换成自己的路径,记得路径或者网址都有单引号引起来的哦
其中default是默认鼠标样式,pointer是手势样式,text是文本,布局结构如下:
- body { cursor: url('图片地址')} /*设置鼠标指针默认为一个小图片 */
- a { cursor: pointer; } /*css注释:设置鼠标移动到a超链接对象时鼠标变为手指形状(链接选择) */
- p { cursor: text; } /* css注释:设置鼠标移动到html页面的p对象时鼠标变为文本选择样式 */
更换后的鼠标样式效果图如下:

5. 博客添加人生倒计时动态
5.1 先在你的博客自定义css样式里面添加人生倒计时进度条的样式表,css样式如下:
/* 时间表 */
.aside-count .content {
    padding: 15px
}

.aside-count .content .item {
    margin-bottom: 15px
}

.aside-count .content .item:last-child {
    margin-bottom: 0
}

.aside-count .content .item .title {
    font-size: 12px;
    color: var(--minor);
    margin-bottom: 5px;
    display: flex;
    align-items: center
}

.aside-count .content .item .title span {
    color: var(--theme);
    font-weight: 500;
    font-size: 14px;
    margin: 0 5px
}

.aside-count .content .item .progress {
    display: flex;
    align-items: center
}

.aside-count .content .item .progress .progress-bar {
    height: 10px;
    border-radius: 5px;
    overflow: hidden;
    background: var(--classC);
    width: 0;
    min-width: 0;
    flex: 1;
    margin-right: 5px
}
@keyframes progress {
    0% {
        background-position: 0 0
    }

    100% {
        background-position: 30px 0
    }
}
.aside-count .content .item .progress .progress-bar .progress-inner {
    width: 0;
    height: 100%;
    border-radius: 5px;
    transition: width 0.35s;
    -webkit-animation: progress 750ms linear infinite;
    animation: progress 750ms linear infinite
}

.aside-count .content .item .progress .progress-bar .progress-inner-1 {
    background: #bde6ff;
    background-image: linear-gradient(135deg, #50bfff 25%, transparent 25%, transparent 50%, #50bfff 50%, #50bfff 75%, transparent 75%, transparent 100%);
    background-size: 30px 30px
}

.aside-count .content .item .progress .progress-bar .progress-inner-2 {
    background: #ffd980;
    background-image: linear-gradient(135deg, #f7ba2a 25%, transparent 25%, transparent 50%, #f7ba2a 50%, #f7ba2a 75%, transparent 75%, transparent 100%);
    background-size: 30px 30px
}

.aside-count .content .item .progress .progress-bar .progress-inner-3 {
    background: #ffa9a9;
    background-image: linear-gradient(135deg, #ff4949 25%, transparent 25%, transparent 50%, #ff4949 50%, #ff4949 75%, transparent 75%, transparent 100%);
    background-size: 30px 30px
}

.aside-count .content .item .progress .progress-bar .progress-inner-4 {
    background: #67c23a;
    background-image: linear-gradient(135deg, #4f9e28 25%, transparent 25%, transparent 50%, #4f9e28 50%, #4f9e28 75%, transparent 75%, transparent 100%);
    background-size: 30px 30px
}

.aside-count .content .item .progress .progress-percentage {
    color: var(--info)
}
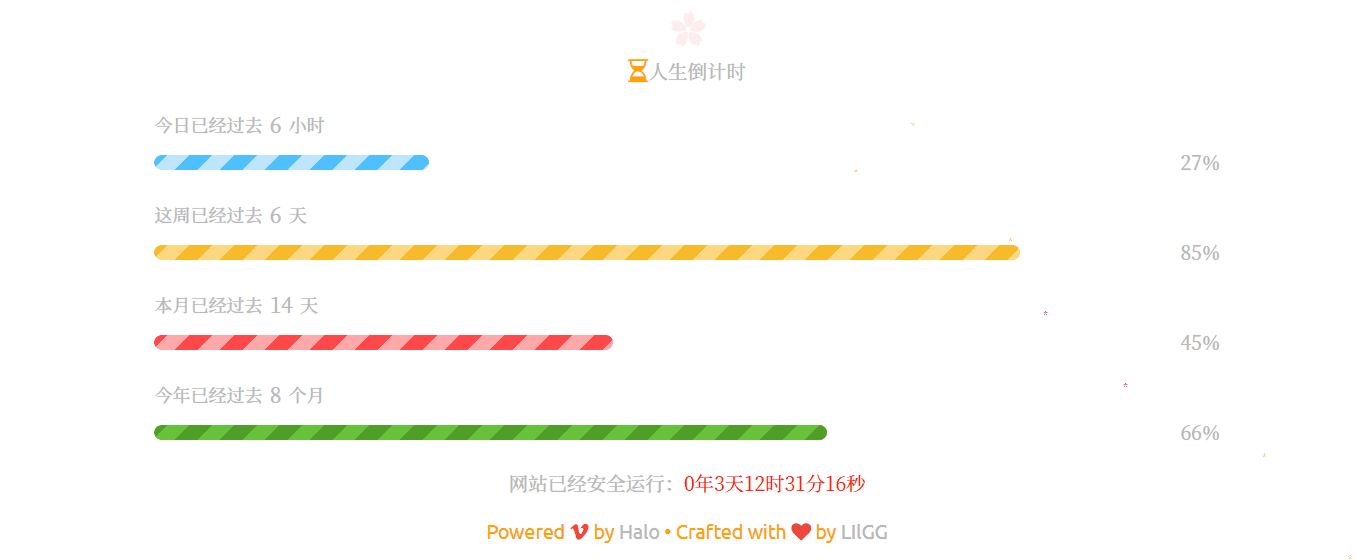
5.2 然后在你博客页合适的地方展现人生倒计时的文字和进度条。这需要根据你使用的博客主题来判断,有些在侧边栏比较窄就显得很好看,例如这样

本博主使用的主题没有侧边栏,所以就放在了网站下方,稍微宽了点,然后代码就放在全局页脚位置或者统计位置
<!-- 人生倒计时代码 -->
    <div class="sidebar-box classListBox">
    <div class="aside aside-count">
        <div class="p-3"><span style="font-size: 1.2em; color: orange;"><i class="fa fa-hourglass-half"></i></span> 人生倒计时</div>
        <div class="content">
            <div class="item" id="dayProgress">
                <div class="title">今日已经过去<span></span>小时</div>
                <div class="progress">
                    <div class="progress-bar">
                        <div class="progress-inner progress-inner-1"></div>
                    </div>
                    <div class="progress-percentage"></div>
                </div>
            </div>
            <div class="item" id="weekProgress">
                <div class="title">这周已经过去<span></span>天</div>
                <div class="progress">
                    <div class="progress-bar">
                        <div class="progress-inner progress-inner-2"></div>
                    </div>
                    <div class="progress-percentage"></div>
                </div>
            </div>
            <div class="item" id="monthProgress">
                <div class="title">本月已经过去<span></span>天</div>
                <div class="progress">
                    <div class="progress-bar">
                        <div class="progress-inner progress-inner-3"></div>
                    </div>
                    <div class="progress-percentage"></div>
                </div>
            </div>
            <div class="item" id="yearProgress">
                <div class="title">今年已经过去<span></span>个月</div>
                <div class="progress">
                    <div class="progress-bar">
                        <div class="progress-inner progress-inner-4"></div>
                    </div>
                    <div class="progress-percentage"></div>
                </div>
            </div>
        </div>
    </div>
</div>
5.3
 function init_life_time() {
            function getAsideLifeTime() {
                /* 当前时间戳 */
                let nowDate = +new Date();
                /* 今天开始时间戳 */
                let todayStartDate = new Date(new Date().toLocaleDateString()).getTime();
                /* 今天已经过去的时间 */
                let todayPassHours = (nowDate - todayStartDate) / 1000 / 60 / 60;
                /* 今天已经过去的时间比 */
                let todayPassHoursPercent = (todayPassHours / 24) * 100;
                $('#dayProgress .title span').html(parseInt(todayPassHours));
                $('#dayProgress .progress .progress-inner').css('width', parseInt(todayPassHoursPercent) + '%');
                $('#dayProgress .progress .progress-percentage').html(parseInt(todayPassHoursPercent) + '%');
                /* 当前周几 */
                let weeks = {
                    0: 7,
                    1: 1,
                    2: 2,
                    3: 3,
                    4: 4,
                    5: 5,
                    6: 6
                };
                let weekDay = weeks[new Date().getDay()];
                let weekDayPassPercent = (weekDay / 7) * 100;
                $('#weekProgress .title span').html(weekDay);
                $('#weekProgress .progress .progress-inner').css('width', parseInt(weekDayPassPercent) + '%');
                $('#weekProgress .progress .progress-percentage').html(parseInt(weekDayPassPercent) + '%');
                let year = new Date().getFullYear();
                let date = new Date().getDate();
                let month = new Date().getMonth() + 1;
                let monthAll = new Date(year, month, 0).getDate();
                let monthPassPercent = (date / monthAll) * 100;
                $('#monthProgress .title span').html(date);
                $('#monthProgress .progress .progress-inner').css('width', parseInt(monthPassPercent) + '%');
                $('#monthProgress .progress .progress-percentage').html(parseInt(monthPassPercent) + '%');
                let yearPass = (month / 12) * 100;
                $('#yearProgress .title span').html(month);
                $('#yearProgress .progress .progress-inner').css('width', parseInt(yearPass) + '%');
                $('#yearProgress .progress .progress-percentage').html(parseInt(yearPass) + '%');
            }
            getAsideLifeTime();
            setInterval(() => {
                getAsideLifeTime();
            }, 1000);
        }
        init_life_time()
5.4 最后在页面统计位置或者侧边栏引用代码即可生成人生倒计时效果图:
<!-- 倒计时引用的JS -->
<script src="https://www.liuzehe.top/upload/bkjs/timeinfo.js"></script>
Q.E.D.